Thursday, August 7, 2008

"Free" Rain Water, Cisterns


Jean de Florette, a film by French director Claude Berri, is set in the scrubby, olive tree-covered hills of southern France. As the film begins, a severe drought has dried up a family's cistern—the underground stone storage tank for rain from a roof covered by a terracotta tiles. A farmer, played by Gerard de Pardieu (of Green Card and Cyrano fame), watches helplessly as his family's crops begin to wither and their cash crop of meat rabbits begins to die of thirst. Two peasant farmers plot to force the neighboring family into bankruptcy. Finally, the two conniving farmers manage to cause the early death of the Pardieu's character, to destroy his family and to acquire the farm for much less than the pre-drought price. All because the cistern was too small to store enough water for the driest years.

For better or worse, cisterns are used throughout the world to catch rainwater from the roof for drinking, washing, and irrigation. Cisterns come in all shapes and sizes—rain barrels, stone wells, ugly black plastic drums, and nondescript gray concrete tanks. In the 1800’s and early 1900s in America, cisterns were common, even in cities.

But the uses of cisterns and the reasons for building your own have changed. Cisterns are experiencing a welcome and well-deserved revival, due to dwindling sources of clean water, erratic supplies during droughts, and a renewed interest in water independence.

Cistern systems are remarkably simple compared to many modern technologies such as wells, and a complicated infrastructure. Basically, the rain must be gathered, stored in a cistern [now loosely defined as any tank in- or above the ground] and drained or pumped to the landscape. In most cases, rainfall is collected from the roof of the home, barn, or garage. A typical gutter funnels the rain into a downspout, hose, or pipe which leads to the cistern itself. A diverter valve is built in the downspout or pipe so the first rains after a dry spell, to flush all kinds of accumulated filth off the roof, can be turned away from the cistern until the roof is clean. Usually, a simple device or grate screens out any twig and leaf debris which may have gathered on the roof. Commonly, modern cisterns are concrete or plastic tanks.

Drought-Proof Your Garden—yes and no
Droughts are often the single source of inspiration for the installation of cisterns throughout the South West, if not everywhere. The recent changes in the climate see to be making much of the South West more parched than years past. As early as the drought of the 1990s, gave rise to the interest and need for water storage.

Ironically, cisterns in regions with no summer rain whatsoever are expensive propositions. In such an area, you must store up enough water for as much as six months of landscape irrigation. Consider, for example, an anonymous two-acre estate in a wealthy neighborhood in Santa Barbara, California, planted with water-loving ornamentals, some drought-resistant plants, a large 1/2-acre lawn, and a vegetable garden. During the drought, such a landscape, based upon the conservative figure of outdoor use equaling 60% of all water use, had a historical year-round usage of a staggering 500,000 gallons! A cistern big enough to hold this much water would have to be a whopping 50 feet on each side and 27 feet tall! Try and hide that in your average backyard. Such a cistern would cause a severe drought in your cash flow.

Note: I somehow lost the usual section "Post a comment". To leave a comment, simply click on the area/button that says "___ Comments" below. Or,clicking on the title of a Post under "Blog Archive" also gets you to a view that gives the option of leaving a comment. Robert

Visit Robert Kourik's web site to learn about his great gardening books.

Tuesday, July 22, 2008

Frequent Irrigation Can Use Less Water


Most drip systems are up and running by now. Yet, do you know where to start to get the proper amount of water on your flowers and/or vegetables? I'm working on a revised edition of my 1995 classic (so I'm told) Drip Irrigation, For Every Landscape and All climates. Here's an excerpt:

Daily irrigation doesn’t mean using countless gallons of extra water. In fact, with infrequent irrigation, it takes a certain amount of water just to rehydrate the soil before the plant can even make use of the moisture. Oddly enough, infrequent waterings can use more water than the same planting would receive with frequent, even daily, irrigation.

Years ago, for example, I planted a drought-resistant landscape, with plants such as lavender, santolina, rockroses, and rosemary, for a neighbor. The day after planting, the timer was set to irrigate each zone for 15 minutes. After the risk of transplant shock was over, the irrigation lines were turned on each day for only eight minutes. The plants flourished, even though each one-half-gph emitter was distributing the paltry amount of seven tablespoons of water-per-emitter each day. Contrast this with a nearby garden with a similar soil and lavender plants arbitrarily watered only twice a month for four hours. This amounts to two gallons per emitter for the two-week period, or just more than 18 tablespoons of water per day—more than twice the water used in the flourishing landscape.

No matter how you use drip irrigation, frequently or every once in a while, it will always be more efficient than any sprinkler you’re currently using. All sprinklers, except the most modern of micro- or mini-sprinklers, apply water faster than many silty and clayey soils can absorb it. This leads to anaerobic puddling and runoff, especially on steep slopes. Every sprinkler is vulnerable to wind- and sun-induced losses, with as much as 25% of the water wasted. In general, sprinklers are rated at an overall efficiency of 75% to 80%, compared with drip irrigation’s 90%. [Furrow irrigation can have an efficiency rating as low as 50%.]

How Long to Water

There are two general approaches to watering, the empirical and the more analytical, which uses the evapotranspiration rate as a guideline. Each works, but the ET-rate-based approach can be far more accurate and water conserving.

The most immediate, or empirical, way to understand your soil’s response to drip irrigation, and to determine how long to leave the system on, involves digging. Even after doing your experiment with the milk jug, you should test for the drip system’s underground pattern of moisture. Turn on the drip system for an hour, then turn off the hose and dig a number of small holes in the flower bed to see how deep and to what width the water has soaked in. Then turn the system on for another hour, to equal a test total of two hours, and check to see how much farther the water moves. Do this for several more intervals of time and observe vague changes in the wet spot. This test will reveal the shortest length of irrigation time to produce the widest wet spot, based on which test hole revealed the widest spread of the wet spot during the elapsed time. Without doing this test, you’ll just be guessing in the dark.


ET-Based Irrigation

Another approach involves using the ET figures for your local climate. Your local Cooperative Extension office should be able to tell you either the current week’s ET rate or the month’s average rate; both are expressed in inches per day or month. If they don’t know, fire them. (Click on the chart to get a bigger version.)

WARNING: Math Ahead.

The chart above shows the daily water use for ten different ET rates. Remember, the amount of water needed to replace the ET losses depends upon the amount of soil covered [like a shadow] by the planting’s foliage. If the plants are young, the ET rate is less, corresponding to the smaller area of coverage. With a mature flower border, the coverage is complete and all you need to determine is the total square footage of the border. For example, a five- by 20-foot border [100 square feet] uses 18.7 gallons of water per day during a hot day when the ET rate is equivalent to nine inches of water per month. If you still prefer to water once a week, multiply the daily ET rate by seven to determine the total amount for the weekly watering.

To determine the length of each day’s watering, take the total amount of water the flower border requires and divide by the total flow of the drip irrigation system. Consider a theoratical five- by 20-foot border with a daily ET rate of 18.7 gallons. Since the total length of in-line emitter tubing in the bed is 84 feet [this figure is reached by adding together one header four feet long and four 20-foot laterals], the sum flow of the system is 52 gph [84 one-half-gph emitters times their actual flow of 0.62 gph]. Thus, dividing the daily water need of 18.7 gallons by 52 gph yields 0.36 hour, or 22 minutes per day 0.36 of an hour times 60 minutes. If you want to water once per week, then multiply 22 minutes per day times seven days to get a weekly watering time of 154 minutes, or nearly three hours.

Please post a comment - I want to know what you think.


Visit my web site to learn about more gardening books.


Note: I somehow lost the usual section "Post a comment". To leave a comment, simply click on the area/button that says "___ Comments" below. Or,clicking on the title of a Post under "Blog Archive" also gets you to a view that gives the option of leaving a comment. Robert

Monday, July 14, 2008

Summer Drought of Color


These photos show my garden in transition to its summer "fallow". Soon I will harvest the foxglove seeds to be scatter at the forest's edge. The Euphorbia spp. dry a golden color before they set seed and "walk around" my garden. Most of the lavenders were really knocked out to a grayish blue due to 90F to 100F dry heat. I have about six still in bloom-the Lavandula angustifolia 'Alba Compacta', L. angustifolia 'Alba' , L. x intermedia 'Dilly Dally', L. angustifolia 'Frost', and several species of Spanish lavender- L. stoechas. Once these are pruned back the garden goes fairly "dormant" except for a Grevillia sp., Lychnis corneriaa, some mulliens, and a glorious radiant-blue Salvia coboreinsis behind a deer fence. I would love to grow cultivars of the California fuschia (Epilodium spp.) but deer love them. Alas, one of the great late-summer native and colorful species is missing from my garden. My garden will be patiently waiting for the fall rains.

Please post a comment - I want to know what you think.


> Visit my web site to learn about more gardening books.


All rights reserved. Copyright 2008

Note: I somehow lost the usual section "Post a comment". To leave a comment, simply click on the area/button that says "___ Comments" below. Or,clicking on the title of a Post under "Blog Archive" also gets you to a view that gives the option of leaving a comment. Robert

Wednesday, July 2, 2008

Summer & Mulch


The following are several excerpts from my book - Roots Demystified, Change Your Gardening Habits to Help Roots Thrive.

It’s time to tend to mulching. If you haven’t already – shame on you. But mulching now is still a blessing for the plants. First a bit about where the nutrients are absorbed.

Most soils will contain more humus near the ground surface, since the highest population of the soil organisms that decompose raw fiber into humus tend to hang out in the most aerobic zone of the soil, that is, in the duff or just under it. [See the enlarged illustration by clicking on the image. From: Roots Demystified.] The upper horizon of the soil is also the place where the most nutrients are liberated. Soil flora and fauna act as nature’s little fertilizing machines, using the creation of humus, among other processes, to liberate unavailable nutrients into a soluble form that can be absorbed by tiny root hairs—a process known as “mineralization.”

One study estimates the number of the bacteria in a gram of soil taken from upper layers of soil surfaces as ranging from 58 million to as many as 3–4 billion. Dig and test just three feet lower, and the bacteria numbers drop to as few as 37,000 per gram.

However, it’s not just the soil’s humus-clay-moisture complex that liberates nutrients. As mentioned earlier, plant roots, stimulated by the action of organisms in the humus, aid in the nutrient-release process by exuding sugars, organic acids, and other compounds to stimulate the microbial action in the rhizosphere.

Plants primarily absorb most of their nutrients in a chemical process called “ion exchange.”

This is a process in which ions (an atom or a group of atoms that has acquired a net electric charge by gaining or losing one or more electrons) are exchanged between a solution and an ion exchanger, i.e., an insoluble solid. Two notable ion exchangers are clay and humus, which are found suspended in the thin, moist chemical and biological activity in this thin layer of moisture converts nutrients into a soluble form that roots can absorb via ion exchange. Humus binds the clay particles so that the clay forms the aggregates that help maintain a more continuous pore space. The perplexing nature of a healthy humus-clay structure is that it both holds onto and releases many of the nutrients plants utilize.

What to do?
Mulch with compost. Be sure the compost you apply to your garden is thoroughly decomposed. A “finished,” properly-aged compost is no longer hot and makes no “steam” when turned or off-loaded from a commercial supplier. The finished material should have almost no recognizable pieces of the original compostable matter. It should also have the sweet smell of a forest loam. To achieve the goal of finished compost, you need to turn the pile two or three times (maybe even more) to incorporate oxygen into all the raw, composting materials. Then let the pile age, so that it develops a large cross section of microbes and other beneficial soil flora and fauna. The process may take up to one year, so plan in advance and always have a pile going for the following garden season. (Using worms to compost kitchen scraps is like a fast compost bin. The raw materials are quickly converted to castings—manure—that both stabilizes and inoculates organic matter better than unfinished compost.)

Commercial compost is often turned, but because of the surface area required by the large quantities made to meet high commercial demand, it is usually not cost-effective to both properly turn and age the compost. Thus, commercial compost is often sold in an unfinished state; beware if you have a load delivered, and it is still hot and steamy. Such compost should be allow to “mellow” until it has a dark, loamy feel, and it may require more turning.

Be forewarned
If too much unfinished compost or fresh manure is added in great quantities, you risk the scourge of symphylans—nasty little critters that thrive in sandy loam soil, soils with a high level of organic matter and friable (crumbly) soil. Symphylans are 1/4-inch long and look like white centipedes. They eat the roots of many vegetable plants and are nearly impossible to banish by any organic method(s). However, a fallow period may be one option. Compulsive “Captains of Compost” are seeing more and more of this horrible pest. It can now be found in the northeastern, north central, and western United States. Beware of applying too much unsifted compost to your garden, especially in sandy loams. The addition of a layer of more than one to two inches may be too much. Keep the organic matter between three and five percent. Check with a lab report.

Please post a comment - I want to know what you think.


Visit my web site to learn about more gardening books.


All rights reserved. Copyright 2008

Note: I somehow lost the usual section "Post a comment". To leave a comment, simply click on the area/button that says "___ Comments" below. Or,clicking on the title of a Post under "Blog Archive" also gets you to a view that gives the option of leaving a comment. Robert

Wednesday, June 25, 2008

Summer Interlude


We’re slipping into summer. A series of hot spells above 100F has really forced flowers to fade quickly and seed heads to form.

My garden is more like the umber rolling hills of California. That means less growth (especially since I don’t irrigate) and less bloom for color. This is due to the deer that favor most of the plants that blossom in the late summer and fall like: California fuchsia (Zauscneria californica; also classified as Eilobium canum canum); roses (the thorns are not a safeguard); and many other summer-blooming exotics that become breakfast, lunch, and dinner for these beautiful; yet pesky animals.

The exotic grasses that have choked out the native bunch grasses and turn a golden-straw color. Seed heads begin to form to release next years regeneration. It’s only natural that some of my garden reflect this pattern. However, I don’t let the exotic grasses to grow in my garden. And I’m reluctant to dig up the few native grasses that cluster near my mailbox. I might have to; so as to fill in among other plants, but they are not that showy and usually prefer steep slopes where the deer can’t get to them.

However, I allow common foxglove (Digitalis purpurea); euphorbia, (Euphorbia characias - pictured here); some lavenders, such as the prolific spreader English lavender, (Lavandula angustifolia), mullein; (Verbascum thapsus); native ginger (Asarum caudatum); and rose campion (Lychnis corneria) to wander about the garden by letting them go to seed. No deadheading here.

Please post a comment - I want to know what you think.


Visit my web site to learn about more gardening books.


All rights reserved. Copyright 2008

Note: I somehow lost the usual section "Post a comment". To leave a comment, simply click on the area/button that says "___ Comments" below. Or,clicking on the title of a Post under "Blog Archive" also gets you to a view that gives the option of leaving a comment. Robert

Monday, June 23, 2008

Even the pros mess up sometimes.


Planted deep as a coffin. Not really, but very deep. I just got back from a trip to St. Louis. The Missouri Botanic Garden is one of the of the top five public gardens in the country. Yet, the pros don’t always get it right all the time. It appears this poor tree was planted two feet lower than it should have been. (To be fair, it probably was the work of a well-meaning volunteer.) That’s my Dad showing how the tree desperately tried to develop roots closer to the surface. (Clicking on the image presents a lager image.) Too much energy to get feeding roots out near the surface and the death of the deeper roots led to the demise of this tree. Lesson for the gardener? Never plant a plant any deeper than it was grown in a pot or at the of color on the trunk of a bare root tree.

Monday, June 16, 2008

Thinking About Tropical Diversity (in the redwood forest!)


On my daily walk, the forest of redwoods (Sequoia sempervirens) the S. gigantea is pictured here), oaks, Douglas firs, and many understory plants seems rather diverse. I wondered if this diversity had any implications to gardens. Maybe yes, maybe no. But today, for some reason I'm thinking about the tropics as well as the temperate climates.

In my opinion, using tropical diversity as a model in the USA is childlike. While the tropics often have lots of vertically-integrated plants, the temperate American landscape, with its hardwood forests, meadows, and prairies, is less vertically complex.


The nutrient mass is primarily above the ground in the tropics, the soil is rather “thin”. By comparison, the deeper soil is the reservoir of nutrients in a temperate ecosystem. Some plants in the tropics actually fix nitrogen on their leaves – “Experiments in a Costa Rican rainforest revealed that fixed nitrogen [by blue-green algae] is directly transferred into the leaf “ (Many tropical plants and trees do fix nitrogen in the soil, but it is “recycled” much more quickly.) From MONGABAY.COM: “The colonial settlers did not realize that they were dealing with an entirely different ecosystem from their temperate forests where most of the nutrients exist in the soil. In the rainforest, most of the carbon and essential nutrients are locked up in the living vegetation, dead wood, and decaying leaves. As organic material decays, it is recycled so quickly that few nutrients ever reach the soil, leaving it nearly sterile”. While in the temperate climates, nitrogen-fixing bacteria grow only the roots beneath the soil’s surface—primarily Rhizobium spp. bacteria found on the roots of the bean family (Fabaceae or Leguminosae) gather the nutrients, especailly nitrogen.

The difference is considerable when applied to the practical. Gardeners in temperate climate work to enhance the fixation and storage of nitrogen the soil mass. While tropical gardeners can rely on foliar feeding of nitrogen and the rapid recycling of nitrogen in a thin soil. (Sugarcane production requires no additional nitrogen due to the independent fixation of this element.)


Please post a comment - I want to know what you think.


Visit my web site to learn about more gardening books.


All rights reserved. Copyright 2008

Note: I somehow lost the usual section "Post a comment". To leave a comment, simply click on the area/button that says "___ Comments" below. Or,clicking on the title of a Post under "Blog Archive" also gets you to a view that gives the option of leaving a comment. Robert

Silly Nuts


While this has little to do with roots, except that the peanut comes from the soil. Peanuts are not harvested above ground.

On my way to-and-from St. Louis, MO; via Southwest airlines, I got this packet of dry-roasted nuts with the silly warning. (Click on the image to read the text on the packet.)

Duh. Some people can't seem to understand the obvious.

(I guess they're also not Kosher.)

Please post a comment - I want to know what you think.

Visit my web site to learn about my gardening books.


NOTE: The comments section at the bottom of the post has disappeared. Click on the "___ Comments" button or the title under the "Blog Archives". Thanks, Robert

Sunday, June 15, 2008

The Myth of the Range of Tree Roots


The following is text from my book: Roots Demystified, Change Your Garden Habits to Help Roots Thrive.

The best book on the topic of fruit tree roots is The Root System of Fruit Plants compiled by a Russian named V. A. Kolesnikov. (As with most scientific papers, only initials are used for all but the surname.) Kolesnikov’s scientific papers appeared from 1924 until 1968, indicating that the USSR regime certainly valued his distinctive research.

Kolesnikov’s primary modus operandi for studying roots was the one he called “The Skeleton Method.” As with Professor Weaver’s studies, this method entailed precise excavation of the roots. In imitation of archaeological techniques, shovels were used first, followed by scoops and, eventually, brushes. This approach preserved more fine root hairs during excavation than the most common practice of using water forced from a hose, or even more than simple washing of the roots.

Kolesnikov’s conclusion is that fruit tree roots grow one-and-one-half to two and even three times the width of the foliage above them. More amazingly, he states that this ratio is maintained throughout the life of the tree, regardless of the rootstock, species, and soil (my emphasis added). This is clearly seen in the apple tree illustration depicted in the left side above. (Click on the image to get a better view.) Each type of fruit tree maintains a slightly different ratio of root mass to canopy. The best place for water, fertilizer, compost, and mulch is beyond the foliar dripline (canopy). This applies to most trees, not just fruit trees. The roots of fruit trees are studied more than ornamental or native trees because they are economic crops.

The illustration on the right is the misguided imagination of a graphic artist. Pretty to look at, but dead wrong. The roots in no way mirror the above-ground foliage.

The relationship of the width of a tree’s root-mass to the amount of moisture it should receive is critical. Applying water near the trunk is wasteful in any climate. In a climate that routinely experiences short droughts of a month or so up to six months (as in parts of the Southwest), drip irrigation is the most efficient way to distribute water to an entire root system.

The climate, however, need not be arid for trees to benefit from drip irrigation. In a study of established pecan trees in humid Georgia, trees with added drip irrigation showed a 51% increase in yields.

It's nuts to irrigate any other way.

Please post a comment - I want to know what you think.

Visit my web site to learn about gardening books.


NOTE: The comments section at the bottom of the post has disappeared. Click on the "___ Comments" button or the title under the "Blog Archives". Thanks, Robert

Pop goes the weasel (tree)


As written in my book Roots Demystified, Change Your Gardening Habits to Help Roots Thrive, amendments are materials such as sand, peat moss, compost, and rice hulls have been added to the planting holes to supposedly improve drainage and keep the soil loose and friable. Fertilizers, such as blood meal, cottonseed meal, greensand, and wood ashes, are those ingredients added to provide mostly nutrients. Some amendments, such as compost, are thought to do both improve drainage and act as mild fertilizers.

One of the best studies of the effect of amendments for fertility was done at Oklahoma State University at Stillwater by Joseph Schulte and Carl Whitcomb. They planted 108 silver maple trees with 11 different soil treatments and a control (untreated planting hole). One conclusion was: "no benefit was derived from the use of soil amendments either with a good clay loam soil or a very poor silt loam subsoil." They found that the control plantings with no additional amendments generally outperformed the plantings with amendments for drainage and fertility.

The loose soil of the amendments in a traditional planting hole makes something like an underground swimming pool full of water when it rains hard, drowning important root hairs. Adding a lot of amendments only leaves the roots unprepared for the shock of what lies beyond the amended area. (And nobody can amend the area of the mature root system seeing as how much wider it is than the foliage.) Often the roots fail to make it out of the well-amended hole and merely circle around in the loose planting medium, rendering the trees likely to blow over during a storm. The trees most tolerant to wind are those with the widest root systems. Or, as the photo shows, not spreading the roots when planting can allow the tree to simply pop out of the ground when hit by a car or pulled out by hand.

Please post a comment - I want to know what you think.

Visit my web site to learn about my gardening books.


NOTE: The comments section at the bottom of the post has disappeared. Click on the "___ Comments" button or the title under the "Blog Archives". Thanks, Robert

Doughnuts of Death, Mounds of Mulch


I just got back from the land of “toxic” mulch – the donuts (as spelled by Dunkin’ Donuts) of death in St. Louis, MO. Every landscape contractor (and maybe home gardeners mimicking the landscape companies) seems to be having a contest as to how high they can pile mulch around tree trunks. Some have mounded mulch 16 inches high or higher. These donuts of death are disasters in the making. Root rots (Phytophtora spp.) like a warm and moist/wet soil. Mulching tree trunks so high has all the ingredients needed for the rot of trunks to kill trees. I saw one tree that had mulch apparently piled over the graft of the now dead tree. (Unfortunately I didn’t have my camera with me at the time.) As the photo says, we must put a stop to this uninformed practice. Landscapers must abandon these donuts of death.

Please post a comment - I want to know what you think.

Visit my web site to learn about my gardening books.


NOTE: The comments section at the bottom of the post has disappeared. Click on the "___ Comments" button or the title under the "Blog Archives". Thanks, Robert

Tuesday, June 3, 2008

Grass - for mowin', not smokin'


I can’t have an “official” lawn because the well at my house is so limited. I just mow the “meadows” till they are brown and less than four-inches tall as if that’ll do anything to stop a forest fire—NOT.

Anyway, I watch with envy as some neighbors with good-producing wells go about planting and watering their lawns. Still it’s water that was meant to trickle through crooks and crannies of the deep underground as it meanders ever so slowly, at my house, to the ocean.

Conserving water should be everyone’s approach to a garden as water is more like a finite resource these days.

There is one fascinating plant to consider as a lawn substitute in dry areas— Buffalo grass (Buchloe dactyloides). This grass naturally grows where the yearly rainfall is 17 inches or less.

A bit of background information:
The man responsible for the amazing “etching” of a Buffalo grass’ root system is John Weaver, a Professor of Plant Ecology at the University of Nebraska for 47 years. Weaver literally went into the trenches to excavate the root zones of plants. Working and recording as carefully as the most compulsive and attentive archeologist uncovering a buried civilization, he spent countless hours following and mapping roots and the patterns they made beneath his feet.

The illustration (From Roots Demystified, Change Your Gardening Habits to Help Roots Thrive, published by me.) was done in west-central Kansas and shows Buffalo grass roots in proportion to their foliage. It must be the extensive depth of the roots that allows buffalo grass to withstand long periods of drought, although 70% of the root mass is in the first six inches of the soil. The plant can be kept mowed to 5-6 inches for a continuous cover. While not as sturdy to foot wear-and-tear as our more common lawn grasses, it does fit the visual desire of a mown meadow. As with many turf grasses, irrigation in the top six inches is ideal for good-looking growth.

To maintain a green turf, Buffalo grass needs only .3 inches of water per week compared to .5 for Bermuda grass, .8 for tall fescue, 1.2 for Kentucky bluegrass and 1.5 for perennial ryegrass. Another way to look at it is that Buffalo grass can last 21-45 days without irrigation, compared with St. Augustine grass, which can need watering every five days.

This native grass has been “domesticated” as a substitute for lawns in dry areas or any place a gardener wants to conserve water. Buffalo grass is well suited to the transition zones of the country, where it’s often too hot for cool-season grasses such as Kentucky bluegrass, perennial ryegrass and tall fescue and too cold for warm-season species like St. Augustine, Bermuda and zoysia. Use one of the more recent selections that are available, and check with your local Cooperative Extension as to its appropriateness for your area. Some examples are: 'Legacy®' and 'Prestige™.

Let me know if you’ve tried this grass and what the results were.

Please post a comment - I want to know what you think.

Visit my web site to learn about my gardening books.


NOTE: The comments section at the bottom of the post has disappeared. Click on the "___ Comments" button or the title under the "Blog Archives". Thanks, Robert

Lavenders - Prune with care-free abandon


Well, not with a weed-whacker or inattentive eyes. But with educated eyes and some trusty clippers.

Most people prune their lavenders wrong. They often cut the flower stem back to where the foliage begins. This works for awhile. However, I found out in the distant past that I ended up with a leggier plant that flopped open from the weight of the blossoms, as is the case with the Spanish lavender (Lavandula stoechas var. 'Otto Quast'). For other lavender species and cultivars, they just had shorter lives as they became more gangly. Eventually I learned that this sub-shrub needs “severe” pruning. NOT back to so-called “dead wood” as nothing will sprout where there are no leaves.

Yesterday I pruned a large Spanish lavender plant. (The “English” varieties are budding, but not yet blooming.) The photograph of my 15-year-old Spanish lavender shows how dramatically I prune. I prune back to where there is only one- to two-inches of foliage. In the photograph, it shows that I cut the flower stems and the foliage by eight or more inches. I filled a 15-gallon container with the clippings of a single five-foot-wide plant. This more radical pruning keeps the plant more compact and less likely to flop open. And such care means a long, healthy life for each lavender.

Try this style of intensive pruning – but not with totally-free abandonment.

Please post a comment - I want to know what you think.

Visit my web site to learn about my gardening books.


NOTE: The comments section at the bottom of the post has disappeared. Click on the "___ Comments" button or the title under the "Blog Archives". Thanks, Robert

Dripping My Way Through the Forest


For anyone interested in water, a rain-gauge is not only an essential tool and toy, but a great topic for cocktail party chit-chat. Did you know, for example, that one can actually overlook 30 to 60 inches of "rain"?

I live on a high ridge dividing a hotter, dryer inland plain from the more temperate, wetter Pacific Ocean climate some five miles to the west. The non-drought average rainfall on top of my cloud-scraping ridge is about 60 inches per year.

Shortly after moving here, I noticed that a foggy summer evening produced the sound of steady rain beneath the tallest trees—even though a meadow 20 feet away remained bone-dry. I soon learned that in my Mediterranean coastal zone, summer "rain," consisting of droplets of condensed fog, is a frequent occurrence

In this climate, with its summer fogs and winter rains, moist air condenses on the leaves of plants and forms droplets like the hot-weather "sweat" on a bottle of cold soda. The collective needles of the Douglas fir trees near my house offer an immense surface area for this condensation.

I set up a rain-gauge beneath the tallest (125 -foot) Douglas fir tree, and over six years I've discovered that this single tree gathers one or more inches of "rain" each summer night during heavy fogs, and half-again to twice the year-round "rain" of the adjacent open meadow. The month of August usually produces six inches of summer fog drip, or an amazing 163,000 gallons per acre of tree foliage!

To utilize nature's original "drip irrigation" and take direct advantage of this free rain, I plant beneath the dripline of the Douglas firs near my patio The difficulty is finding plants that are somewhat drought-tolerant, shade-loving and deer-resistant. So far my list includes most of the varieties of Daphne (Daphne spp.); wild ginger (Asarum caudatum); native Western ferns; foxgloves (Digitalis spp.); huckleberry (Vaccinium ovatum); Forget-me-nots (Myosotis scorpioides); salal from Northern CA, OR and WA (Gaultheria shallon); the native thimbleberry (Rubus parviflorus); Euryops pectinatus (gets leggy, must have late evening light); and various ornamental grasses. Soon to be infiltrated by Rhododendrons spp., Azaleas spp., and bear berries (Mahonia spp.)

Please post a comment - I want to know what you think.

Visit my web site to learn about my gardening books.


NOTE: The comments section at the bottom of the post has disappeared. Click on the "___ Comments" button or the title under the "Blog Archives". Thanks, Robert

Saturday, May 31, 2008

Mulch 'Mators


The perfect tomato is the Holy Grail of many gardeners. Especially in the coastal, marine-influenced climate where I live. I’ve watched neighbors plant tomatoes where the summer fogs are frequent and nurture, worry, persist and try every way they read in the books and magazine articles to eke out a handful of tomatoes. Probably at a real cost of $10 per tomato, or more. Whereas just 2 miles east, over the high hump of the land that captures so much summer fog, tomatoes thrive. So, I buy them at the farmer’s markets and save lots of money and elbow grease.

Back in the ‘30s a man named John Weaver had the patience to excavate entire root systems. He dug a trench along side of the base of each plant and proceeded to excavate, scrape, and dust his way through soil – much like an archeologist at work - to reveal in exquisite detail the full extent of a plants root system. He (or someone else – the book makes no comment as to who did the drawings that resemble etchings) mapped mostly economic vegetable crops. Weaver must have been the Saint of Patience. I often wondered if he had a wife (no search found any clue) who could understand his work and have the same patience he must have had.

In Weaver’s experience, a tomato seed planted in ideal outdoor soil, with no transplanting involved, can grow a taproot to the depth of 22 inches at a rate of one inch per day. The tomato is yet another vegetable that prefers to grow a taproot, which is often damaged during transplanting. Young seedlings transplanted several times into increasingly large pots before their final move into the garden will probably end up with a root system more fibrous than that of tomato plants planted by seed in the garden which are allowed to grow a conventional taproot. However, transplanting tomato-plant stems deep into the soil will produce many adventitious roots along the length of its stem (See Weaver’s illustration.), creating a great root system early in the life of the plant, more advantageous than seed grown in the garden.

The illustration is drawn on a one-square foot grid (Taken from my book Roots Demystified, change your gardening habits to help roots thrive.) and shows how massive the root system is for one plant. At seven feet wide it changes one’s perspective of how much mulch is required to keep all the roots happy. In cool climates you might experiment with paper from an office or home shedder to help reflect light into the canopy of the plant. Turn all those shredded unsolicited checks from your credit company into wonderful tomatoes!

I don’t know of anyone planting tomatoes by direct seeding in the ground. Do you?

Please post a comment - I want to know what you think.

Visit my web site to learn about my gardening books.


NOTE: The comments section at the bottom of the post has disappeared. Click on the "___ Comments" button or the title under the "Blog Archives". Thanks, Robert

A Gardener's Repast - sometimes


I've often observed that many garden fanatics don't have place to sit and relax and enjoy the view and soak up the fragrances and sunlight. I gardened for seven years as a fanatic vegetable and fruit gardener before I put in some places to sit.

They are large rounds of a tree with half of the back chained sawed off. After 25 years they still allow visitor to sit and enjoy two views of the garden. Now I’ve added two proper seats - Adirondack chairs - for visitors as I still don't sit in my garden that much. But when I have guests over we all relax in various chairs and benches. I like to let plants wander around my garden. If two people sit in these chairs, they must be careful to avoid the foxglove for one season - as it will soon go to seed.

Then there’s chairs as art. The overgrown-white chairs pictured here are from the eccentric garden of Maxine and Jeff. Mostly found objects fill their whimsical garden and the white chairs are for look only. The bench, however, is one of several that allow them to rest and enjoy the garden with friends. (Notice the seats to the right-for "show" only.)

As with all my posts, click on an image to get a larger view.

Please post a comment - I want to know what you think.

Visit my web site to learn about my gardening books.


NOTE: The comments section at the bottom of the post has disappeared. Click on the "___ Comments" button or the title under the "Blog Archives". Thanks, Robert

Thursday, May 29, 2008

Roots Grow Up!


Surprisingly, many of a tree’s feeding (not “structural” roots) roots grow up, not down. In a paper published in The Landscape Below Ground (International Society of Arboriculture, 1994. pg. 3), Professor Thomas O. Perry states “Most tree roots range in diameter [from that of] of a lead pencil to the size of a hair. These smaller roots…grow upward into the surface inches of soil and the litter layer.”

The significance of the importance of the most aerobic layers of the soil and duff can be seen in a simple study using potted tree seedlings. You can see the dramatic difference in the illustration of growth between the three soil depths. The seedlings in the pot on the left are growing in soil collected from the top two inches. The middle pot has soil only from the 2-4 inch depth of a forest floor. The pot on the right is trying to grow in subsoil.

The top two inches is so vital to a tree’s health, whether it’s native or ornamental. This is also the favorite two inches for all the plants in a humid climate with periodic rains. Take away that top two inches by planting it to lawn, raking the duff up for “a cleaner look” or allowing so much foot traffic that the roots are exposed, and you have a disaster in the making. This is perhaps the most important illustration in Roots Demystified because it so graphically reveals where tree and shrub roots prefer to grow and feed.

The photo is of a cross-section of three feet of soil beneath a vineyard. Most of the roots are in the top foot or so of the soil. Below that level it gets increasingly more like clay subsoil. (If you click on the image to enlarge it, you will see a few roots below the first foot and even a few that found the lens of gravel.)

The aerobic-loving soil life – where you find the most soluble nutrients - needs to breathe. The deeper you go, the less aerobic you get, and the number of “good guys” (beneficial soil flora) will rapidly diminish. Studies done with agricultural plants provide a lot of useful information. One example is alfalfa, it can grow roots much deeper than peach trees can, yet both get most of their moisture (along with nutrients) in the top one to two feet of the soil.

But trees still need “dirt”. Perry puts it quite succinctly when he says that trees on soils as little as five inches thick produce only poor tree and shrub growth. (one can then imagine how far the roots must grow laterally in the shallow soils to gather sufficient moisture and nutrients.) You can get fair growth with a ten-inch depth, good growth at 16 inches and excellent growth with 20-30 inches of topsoil. Most remarkably, according to Perry, the tree vigor is likely to gradually decrease with soil deeper than 30 inches. (The Landscape Below Ground, International Society of Arboriculture, 1994. pg. 9)

A PRACTICAL TIP FOR GARDENERS
As I’ve often said: mulch, mulch, mulch. Replicate the duff that forms in a natural forest. Establish as many permanent pathways as possible. Try to let the pathways “breathe”—allowing the air to flow into the roots and the carbon monoxide to be expelled. You can use chipped bark, chipped tree trimmings, gravel or whatever local material suits you.


Please post a comment - I want to know what you think.

Visit my web site to learn about my gardening books.


NOTE: The comments section at the bottom of the post has disappeared. Click on the "___ Comments" button or the title under the "Blog Archives". Thanks, Robert

Wednesday, May 28, 2008

Bee Kind to My Foxglove


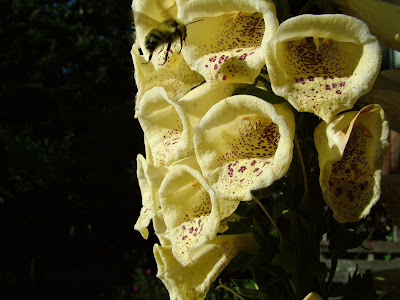
I love foxgloves even though they are not native plants. Each deep-throated foxglove flower stimulates my spirit. The color cascading from each blossom engages my eyes. This photo of a special creamy-white foxglove is the first one with this color to show up in the 25 years I’ve lived here.

While considered an exotic “invader” I like to have it in my garden as a form of controlled chaos. Each year I let the tall flower stalks go to seed and spread their fine, brown seeds where ever they may. This means leaving the flower stalks to mature to an earthy brown. No dead-heading here. No place in my garden for Martha Stewart. These sentinels of future generations remain for weeks until the tiny up-turned cups of the remaining flower parts fill with mature seed and begin to spill with each gust of wind. Sometime I scatter a few seeds myself. (The tallest flower stalks seem to be those growing from seed they have cast asunder, not the seed I plant.)

All this makes for a very kinetic garden as the years go by. One year I had a glorious stand of foxgloves at the end of the main path into my garden. More than two dozen plants reaching four- to six-feet in the air. Each a different shade from hot rose to pale pink to creamy white. The next year they popped up in the soil surrounding the small swale that drains water away from water-sensitive plants on the adjacent berm. This year they have appeared in the soil and mulch left behind after grinding a dead tree stump into oblivion. How they got there, some 20 feet from last years stand, I’ll never know.

The seed needs to fall where there isn’t too much competition. Yet it will grow above some of the grasses. But in the end, it really prefers open soil, my mulched areas or I’ll find clusters of plants will thrive at the edge where mowing meets the more rangy parts of the garden. For the first year the dark-green leaves flourish as they gather the photosynthetic momentum for the flower stalk to thrust skyward. The handful of leaves at the tip of the plant are a pleasure to look at, with a subtle display of the Fibonacci pattern. (The Fibonacci series is the mathematical form portrayed in the cross section of a nautilus shell or the pattern of seeds on a sunflower head.)

Our eyes see delightful beauty in our gardens. Yet, some of the splendor in garden flower remains unseen. Each foxglove blossom has a different set of splotches all the way into its throat, like little runway guides leading to the sweet nectar. These are intriguing enough. But there’s more. Pollinating bumble bees (as seen in the above photo) see something beyond our vision. Bumble bees have a pair of six-sided, compound eyes and three simple eyes. Even with such complex eyes, their sight is accurate for only about three feet. A special light guides bumble bees on their lusty journeys for pure nectar. Bumble bees see ultraviolet light. A pattern of ultraviolet coloration lures a bumble bee into the foxglove flower’s throat. These patterns unseen by our eyes act like the signals of an airport’s landing strip. And the ultraviolet splotches of color don’t match the random splotches we see in the sunshine.

The earth’s protective atmosphere shields us from much of the sun’s ultraviolet light (radiation). Enough ultraviolet radiation filters through to aid bumble bees in their daily journeys. Even on a cloudy day, the bumble bees see the ultraviolet spectrum by cloud-penetrating ultraviolet light. What assists bumble bees on their quest for pollen and nectar can cause us to sunburn—part of the two-sided tapestry of life.

In each blossom the pollen is in the roof of the flower so the upper body of the bumble bee is brushed with the pollen as the bumble bee goes deeper into the blossom to seek out the sweet nectar. After flying to another flower, the pollens are mixed and seed formation begins. The pollination process leads to a plant with a mixture of colors. Yet an isolated stand with creamy flowers will remain shades of cream until a seedling of a rose-colored blossom pops up nearby. Then things get interesting as different blends of color appear.

Foxglove (Digitalis purpurea) is the source of digitalis—a heart medication. According to the American Heart Association: “Digitalis is a drug that strengthens the contraction of the heart muscle, slows the heart rate and helps eliminate fluid from body tissues. It's often used to treat congestive heart failure and is also used to treat certain arrhythmias. Digitalis has been described in medical literature for over 200 years.” The extract is taken from the leaves. (Two synthetic mimics of digitalis are Digitoxin and Digoxin.) India supplies most of the cultivated digitalis. Others sources are wild crafted (gathered from wild, un-cultivated areas) in Europe, from Germany, Switzerland, Hungary and Italy. Digitalis is toxic at very low levels.

Please post a comment - I want to know what you think.


Visit my web site to learn about my other gardening books.


NOTE: The comments section at the bottom of the post has disappeared. Click on the "___ Comments" button or the title under the "Blog Archives". Thanks, Robert

Tuesday, May 27, 2008

Taproot Myths Revealed


This is a photograph of a young tan-oak seedling, sometimes called tanbark trees as their bark was stripped off and used to tan animal hides. These trees used to be classified as a species of Quercus (oak), now reclassified by botanists with time on their hands as Lithocarpus densiflorus. Don’t ask me why. This seedling has a stem with a few leaves five inches above ground and seven inches of a taproot, all I could dig out. (Click on the photo to see a much larger image.)

In my book, Roots Demystified, change your gardening habits to help roots thrive, I talk about how few trees actually grow with taproots. Oaks are an exception, for awhile.

Some Californian and western oak trees (including the tanbark oak), begin growing with a taproot, which then naturally atrophies. The loss of the taproot can begin as early as the first or second season. When the young seedling of a blue oak is a mere three inches high the taproot can already extend 40 inches into the soil. After a number of years, the taproot withers, to be replaced by heart roots (which angle down from the base of the tree) and many laterals, with vertical sinker roots. In Spruce (Picea spp.), Hemlock (Tsuga spp.) and Cedar (Cedrus spp.) trees, at less than eight years, the lateral and oblique roots take over the role of support and the taproot declines. (From: “Natural Root Forms of Western Conifers”, S. Eis; From: Proceedings of the Root Form of Planted Trees Symposium, page 24, 1978.) After the taproot atrophies, the new root system grows more horizontal and oblique roots and resembles a fibrous root system.

In my photograph the roots are about as long as the stem and leaves. However, much of the tiny taproot was left in the ground judging by the thickness of the bottom of this seedling as it was dug with a spading fork. The seedling sprouted in deep shade which probably accounts for the extended length of the stem.

Any oak planted from any container or balled-and-burlapped stock has effectively had its taproot destroyed and forms a fibrous (heart roots) root system.

I think the sturdiest oaks are grown like nature, from seed placed where you want a specimen for your grandchildren to climb on.


Please post a comment - I want to know what you think.

Visit my web site to learn about my gardening books.


NOTE: The comments section at the bottom of the post has disappeared. Click on the "___ Comments" button or the title under the "Blog Archives". Thanks, Robert

Sunday, May 25, 2008

Scatological Blossoms


Scat on my gravel driveway makes me happy.

Scat (the politically-correct way to refer to animal feces – which also masks the street language version) usually means the bobcat or mountain lion (cougar) is back. These animals seem to like pooping on my driveway to mark their territory.

The wonderful result is the deer vanish. They smell the marked territory.

I have not seen any deer for the past week. Today I found a fresh pile of scat on the edge of the driveway.

The beauty of it is that I get more splendor in my garden.

When I first moved here 23 years ago I planted the rockrose ‘Sunset’(Cistus ‘Sunset’) and enjoyed its hot-pink blossoms. The shrub had to be taken out when the stump next to it was ground up into a pile of wood chips. Then three years ago I planted another one. The deer proceeded to eat every flower bud and kept the plant as a half-sphere of foliage. The foliage is nice, but the flowers are spectacular. This week the plant is covered with its crape paper hot-pink petals. Other plants are blooming unlike years before when the deer ate the blossoms and foliage

When I first moved here I put some of those road reflectors that mark highway lanes down the middle of our gravel driveway. (To prove we weren’t entirely country hicks. Of course the two “lanes” would apply only to motorcycles.) The next morning there was a fresh pile of bobcat scat on top of one of the reflectors. A message saying “Hey I was here first. What right do you have to invade my territory?” Just marking its territory, and scaring off the deer.

This winter I found a perfectly intact, fresh deer skeleton with three points. No bobcat could take down such a large buck. It meant the mountain lion was back.

I walk past the scat on my road each day as I take my speedy, aerobic walk. I wear a red shirt and a purple hat so I don’t look like lunch to a mountain lion. Hope it continues to work.

Please post a comment - I want to know what you think.

Visit my web site to learn about my gardening books.


NOTE: The comments section at the bottom of the post has disappeared. Click on the "___ Comments" button or the title under the "Blog Archives". Thanks, Robert

Saturday, May 24, 2008

Gophers & Robins - who would have guessed?


Gophers love roots and moles love worms.

Robins also love worms. They all came together one year just about this time.

I was watching from my second-story window as a gopher bumped up against the concrete slab that is part of my patio. The gopher was pushing its mound of soil (a throw) against the concrete. A robin landed on top of the throw and ate worms as they appeared from below.

It was the vibration that sent the worms topside to an ugly death. This is not just a single weird occurrence. There are worm “hunters” in Florida that gather worms for fishing bait by “thumping”. They have a wide, long board which they insert into the soil. With a wooden mallet they strike the top of the board that’s sticking above the soil. A gradual, rhythmic “thumping” causes a vibration that in turn causes worms to come crawling out of the ground. This time to lure unsuspecting fish.

That gopher was the thumper for the robin.

Please post a comment - I want to know what you think.

Visit my web site to learn about my gardening books.


NOTE: The comments section at the bottom of the post has disappeared. Click on the "___ Comments" button or the title under the "Blog Archives". Thanks, Robert

Friday, May 23, 2008

This Tree Needs Caterpillars


Caterpillars are pests aren't they? Not always.

It turns out the native coast live oak (Quercas agrifolia) that grows around my house co-evolved with a tiny caterpillar, appropriately named the oak-leaf caterpillar. Without the caterpillar, the oak tree might die during years of stress.

A nursery in Los Altos, CA has a gorgeous coastal live oak about 75 feet in diameter. During the drought of the early ‘70s a lot of trees were very stressed. A neighbor near the nursery sprayed their oak, “to get rid of the messy droppings and fallen leaves”. The nursery carefully watched their tree lose many leaves and be riddled with leaves partially eaten by the oak-leaf caterpillar.

Guess which tree died?

The neighbor’s. Because it had 100% of it’s green leaves to transpire moisture. Even an organic spray, such as Bacillus thuringiensis var. kurstaki, would have lead the tree to an early death. At the nursery, the tree survived as much of it’s leaf area was consumed by the caterpillar, offering less area for transpiration.

Judging by the moths at my screened windows and the partially-eaten leaves, the first round of oak-leaf caterpillars is here. There are two to three groups of moths each season depending on how dry the year is.

Please post a comment - I want to know what you think.

Visit my web site to learn about my gardening books.


NOTE: The comments section at the bottom of the post has disappeared. Click on the "___ Comments" button or the title under the "Blog Archives". Thanks, Robert

Thursday, May 22, 2008

Grevilleas & Hummers


This is a photo of my Grevillea spp. in bloom. Alas, I lost the species name. However, that hasn’t stopped the humming birds from frequenting these remarkable flowers all year round. This plant along with most Grevilleas blooms throughout the year. During Spring the amount of bloom dramatically increases. They are all deer-resistant and drought resistant (hardy). I have never watered this plant when I planted it in the fall some 12 years ago. These plants are from the Mediterranean climate zone in Australia. They come in every shade of red, orange, yellow, pink, and nearly white. I don’t know of any with blue flowers. I find the unusual form of the flower to be quite fascinating.

Please post a comment - I want to know what you think.

Visit my web site to learn about my other gardening books.


NOTE: The comments section at the bottom of the post has disappeared. Click on the "___ Comments" button or the title under the "Blog Archives". Thanks, Robert

Tuesday, May 20, 2008

Floating Butterflies


A common summer visitor to my garden drifts into my garden meadow. It is the tiger swallow tail butterfly. The swallow tail darts about with bursts of flight. Sups from the sweet nectar of the South African red-hot poker. Flies off to careen by the wild huckleberry shrubs north of my house, they’re not in bloom. Swirls around the other sides of my home where there is no nectar. Returns to lick within the trumpet-shaped flowers of this colorful exotic plant. Another swallow tail butterfly joins in the flirtation with plants, the breeze, and the first butterfly. Up, fluttering. Dips. Floats. Surveys the huckleberries again. Around the house. Past the red-poker to sail past the leaves of an apple tree past bloom. Coasts back for a treat from the glorious torch. They circle the house. Flirt with each other and an apple tree, and the drifts into my garden meadow with its pale-green leaves. Flutters around my house. Drinks from the trumpet-throated poker blossoms. Darts off to another pasture of floral nectar.

Where is the pattern? The repetition of the nectar-driven flight around my house? Broken by erratic flight. There’s really no design to be found. I amuse myself by looking for a pattern within the fanciful chaos of nature’s gossamer treats—a butterfly on the wing on a warm spring afternoon.

The tiger swallow tail butterfly is the most common butterfly around my home, expect, perhaps, the white cabbage butterfly. The photo above shows the butterfly as collected in my youth—over 40 years ago. I was a regular ecological disaster looking back from 2008. But collecting butterflies was just one of the myriad exploits of a young “naturalist” in the ‘50s and ‘60s. Besides, we had no idea what the future would bring (or not bring as the case may be). Now catching a butterfly for mounting as a specimen would be a heinous crime.

In my early years there were dozens of butterflies and moths. A friend here in Sonoma county had a collection of over 70 varieties. Now, I spot only 10-15 or so varieties each summer. The swallow tail eats the leaves of the prolific wild anise (Pimpinella anisum). But there not much habitat left for the delights of other butterflies. Other losses of butterflies could be the increasing vineyards and their use of pesticides and fungicides. Other reasons remain a mystery.

Sunday, May 4, 2008

Plants Don't Bleed to Death


Most trees don’t commit suicide by bleeding to death.

The same is true for shrubs, vines, and other perennials.

If you’ve ever had maple syrup on pancakes, you’ve eaten a bleeding sugar maple tree (Acer saccharum). Not only do the trees not die, they are tapped again the next season and for as long as 100 years. Same goes for true rubber. Slices in the bark of the rubber tree (Hevea brasiliensis ) allowed the latex sap to dribble into containers. Same tree every year for many years..

The photo on the lower left is a droplet of sap coming from a pruned Kiwi vine. I pruned the second-story vines late this year. (Rain, book to finish, coordinating an assistant, blah, blah, blah…) The end to the remaining vines dribbled like a leaky hose. For days. Now, some four weeks later, the leaves are beginning to show at the bud just behind the cut.

Why, you might ask, Kiwi’s on the second floor of my house that requires two people to lift and position the ladder? I transplanted two vines from a friend’s fence only to find out they were both females. (I have gotten as much as 25 fruits with no male Kiwi around. Figure that one out!) My foremost reason was to provide an arching canopy along the length of the south-facing wall. (I have friends with a multitude of fruit I can share.) The idea was to have a well-shaded house for our hot Indian summer days. I certainly wasn’t planning on a crop two floors off the ground. So, I prune them for shade by cutting most of the vine back to main vine and some laterals. By the end of the summer some of the vines have arched gracefully ten feet, or more, over the patio below. The cloak of the leaves is both beautiful and functional.

You can see my house in early fall in the third photo with a bit of the wall in the sun.

Please post a comment - I want to know what you think.

Visit my web site to learn about my other gardening books.


NOTE: The comments section at the bottom of the post has disappeared. Click on the "___ Comments" button or the title under the "Blog Archives". Thanks, Robert

Sunday, April 27, 2008

Lavender, Part 2


It’s lavender time in my garden.

The first parade of the season of royal-blue lavender blossoms has begun. Spanish lavender (
Lavandula stoechas) leads the way with a burst of sapphire-blue flowers.

(Actually there is a species of lavender that has blossoms in a prayer-like fashion during most of the year. It’s the French lavender (
L. dentata). In the Spring it begins to bloom more abundantly, but with a more subtle smokey-purple. Far from the drama of Spanish lavender during the warm-hot weather of spring.)

The amazing color of Spanish lavender comes not from the flowers them self, but rather from the bracts on top of the flower’s head that look like bunny ears. Or, flames of a royal-blue color. The true blossoms that hold the nectar so eagerly sought after by honey bees and bumble bees are found in four lines of deep blue, ever so tiny, on each of the four sides of the head. The later are the most frequent pollenizers in my garden.

Spanish lavenders cross pollinate in my garden to produce some amazing new plants

The photo on the left is a typical display of Spanish lavender as it is commonly expected. The photo on the right is a chance seedling that appeared along my pathway. The nearest Spanish plants were 12 feet way on the other side of the driveway. I don’t know of any crossing between Spanish lavender and other
Lavandula species. (The true flowers are the little white spots below the bracts.)

This plant has a moon-like, pale-yellow bracts and is not found anywhere in the trade. What a joy it was when it first appeared 12 years ago. A special variety just for me. (And anyone who wants to take cuttings.)

L. stoechas Viridis” has also begun to bloom prolifically and is my favorite species for grilling. This plant has none of the characteristics of what people think of a lavender. The foliage is decidedly yellow-green, rather than the darker green foliage English lavender (L. angustifolia). The bracts are yellow to the point of being somewhat chartreuse. This is my favorite foliage to grill with. The bracts and flower heads have no scent. Ah, but the foliage has is a rustic, resinous herbal, and seemingly wild flavor that is transformed in the process of grilling to a delightful seasoning with a hint of rosemary. (See my recipe on the blog for March 28th.)

Please post a comment - I want to know what you think.


Visit my web site to learn about my other gardening books.


NOTE: The comments section at the bottom of the post has disappeared. Click on the "___ Comments" button or the title under the "Blog Archives". Thanks, Robert